Colima on Mac M2


Colima is one of my favorite tools to work on container runtimes on macOS (and Linux).
Colima launches Lima behind the scenes and sets up VMs with a container runtime and K8S.
Install Colima: See official guide here
Before we get started, let do some checks
$ docker --version

Docker version 24.0.6, build ed223bc
$ kubectl version --client=true
Client Version: v1.28.2
Kustomize Version: v5.0.4-0.20230601165947-6ce0bf390ce3$ colima --version
colima version 0.5.5Local K8S cluster
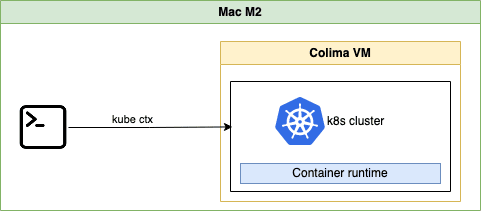
Let create Colima VM with Docker runtime, 2 CPU, 4Gi RAM, Disk 30Gi, K8S enabled.
colima start \
--runtime docker \
--cpu 2 --memory 4 --disk 30 \
--kubernetes
List colima VMs
$ colima list
PROFILE    STATUS     ARCH       CPUS    MEMORY    DISK     RUNTIME       ADDRESS
default    Running    aarch64    2       4GiB      30GiB    docker+k3s

$ limactl ls
NAME      STATUS     SSH                VMTYPE    ARCH       CPUS    MEMORY    DISK     DIR
colima    Running    127.0.0.1:64426    qemu      aarch64    2       4GiB      30GiB    ~/.lima/colima

$ docker context ls
NAME                TYPE                DESCRIPTION                               DOCKER ENDPOINT                                     KUBERNETES ENDPOINT   ORCHESTRATOR
colima *            moby                colima                                    unix:///Users/thetran/.colima/default/docker.sock
Get K8S pods
$ kubectl get po -A
NAMESPACE     NAME                                     READY   STATUS    RESTARTS   AGE
kube-system   local-path-provisioner-957fdf8bc-t87ps   1/1     Running   0          22m
kube-system   coredns-77ccd57875-74rp6                 1/1     Running   0          22m
kube-system   metrics-server-54dc485875-dgmqw          1/1     Running   0          22m
Verify K8S cluster setup
Let install ingress-nginx into the cluster and create simple deployment to verify our cluster setup
helm upgrade --install ingress-nginx ingress-nginx \
  --repo https://kubernetes.github.io/ingress-nginx \
  --namespace ingress-nginx --create-namespace
Create a simple deployment
kubectl apply -f https://raw.githubusercontent.com/quangthe/boilerplate/main/k8s/example-ingress.yaml
The output looks like this:
deployment.apps/web created
service/web created
ingress.networking.k8s.io/example-ingress created
Get deployment, service and ingress
$ kubectl get deploy,svc,ing -l=app=web

NAME                  READY   UP-TO-DATE   AVAILABLE   AGE
deployment.apps/web   1/1     1            1           5m12s

NAME          TYPE           CLUSTER-IP     EXTERNAL-IP    PORT(S)          AGE
service/web   LoadBalancer   10.43.53.214   192.168.5.15   8080:30314/TCP   5m12s

NAME                                        CLASS   HOSTS              ADDRESS        PORTS   AGE
ingress.networking.k8s.io/example-ingress   nginx   hello-world.info   192.168.5.15   80      5m12s
SSH to Colima VM with colima ssh command and curl the ingress IP with Host header:
$ curl -H "Host: hello-world.info" 192.168.5.15/

Hello, world!
Version: 1.0.0
Hostname: web-548f6458b5-h7g2d
⭐️ Bonus: Secure the ingress with cert-manager
Let's install cert-manager on the cluster and generate the self-signed certificate (use for local development) to secure the ingress.
helm install \
  cert-manager jetstack/cert-manager \
  --namespace cert-manager \
  --create-namespace \
  --version v1.13.0 \
  --set installCRDs=true
Then create selfsigned cluster issuer
cat <<EOF | kubectl apply -f -
apiVersion: cert-manager.io/v1
kind: ClusterIssuer
metadata:
  name: selfsigned
spec:
  selfSigned: {}
EOF
Now secure the ingress
apiVersion: networking.k8s.io/v1
kind: Ingress
metadata:
  annotations:
    # use created selfsigned cluster issuer
    cert-manager.io/cluster-issuer: selfsigned
    nginx.ingress.kubernetes.io/rewrite-target: /$1
  labels:
    app: web
  name: example-ingress
  namespace: default
spec:
  ingressClassName: nginx
  rules:
  - host: hello-world.info
    http:
      paths:
      - backend:
          service:
            name: web
            port:
              number: 8080
        path: /
        pathType: Prefix
  # configure tls for the ingress
  tls:
  - hosts:
    - hello-world.info
    secretName: hello-world-tls
Inside the colima vm, edit the /etc/hosts file, add line 192.168.5.15 hello-world.info, then curl the ingress by domain (-k option: ignore the self-signed certificate)
curl -k https://hello-world.info
Hello, world!
Version: 1.0.0
Hostname: web-548f6458b5-h7g2d
Inspect the self-signed certificate
echo | \
openssl s_client \
-showcerts \
-servername hello-world.info \
-connect \
hello-world.info:443 2>/dev/null | \
openssl x509 -inform pem -noout -text
The output will look like this
Certificate:
    Data:
        Version: 3 (0x2)
        Serial Number:
            53:e7:85:8a:27:65:10:b3:f0:17:8c:ae:e2:61:f3:40
        Signature Algorithm: sha256WithRSAEncryption
        Issuer:
        Validity
            Not Before: Sep 17 04:50:57 2023 GMT
            Not After : Dec 16 04:50:57 2023 GMT
        Subject:
        Subject Public Key Info:
            Public Key Algorithm: rsaEncryption
                Public-Key: (2048 bit)
                Modulus:
                    00:c7:d8:dc:4e:b2:4a:ba:1d:96:50:5a:92:96:9e:
                    f6:cd:70:37:eb:ce:f5:e9:59:0f:da:70:1d:b4:47:
                    c8:51:65:79:7d:b7:21:31:f5:dc:b6:cb:40:6c:1b:
                    c0:28:9a:d9:3e:90:7b:92:8e:a9:75:40:07:5f:17:
                    c3:3d:9a:2a:e2:f2:4f:3f:be:ce:92:a9:68:6b:06:
                    3e:6d:5a:5b:68:d1:a8:b2:da:34:9e:49:e4:dc:bf:
                    85:44:ca:95:6c:23:15:c1:fe:c3:89:03:fc:47:49:
                    6c:87:44:eb:9c:a4:d4:c2:68:5a:ce:05:55:b9:f8:
                    12:27:90:e8:04:01:5f:26:ab:be:ad:50:44:89:c1:
                    79:9c:25:01:24:0d:d7:e5:c7:be:31:b4:35:93:84:
                    f3:53:f2:6a:10:69:53:55:12:dc:e7:89:d1:ea:7d:
                    86:ed:e0:51:47:46:ab:3b:37:94:49:28:58:22:53:
                    2e:52:50:d5:57:b8:5b:12:e1:ce:17:00:e4:7f:1d:
                    e1:b5:64:21:34:69:d9:c3:46:e0:4d:e0:35:8e:c2:
                    38:c4:c7:ed:a6:26:a7:c1:67:bb:f4:5c:b7:0c:67:
                    10:13:33:12:e0:b0:83:8c:74:24:00:98:be:8a:fe:
                    b6:91:cf:19:47:a3:b6:aa:7a:66:e8:2f:8b:8e:6b:
                    7e:a9
                Exponent: 65537 (0x10001)
        X509v3 extensions:
            X509v3 Key Usage: critical
                Digital Signature, Key Encipherment
            X509v3 Basic Constraints: critical
                CA:FALSE
            X509v3 Subject Alternative Name: critical
                DNS:hello-world.info
    Signature Algorithm: sha256WithRSAEncryption
    Signature Value:
        2f:0a:63:53:af:c0:94:4f:e4:6d:fd:02:40:c0:d0:bb:e7:00:
        65:3c:5c:fa:da:81:70:65:00:9d:75:c5:1d:e6:e9:91:ee:25:
        9f:50:22:dd:d7:f3:57:12:79:39:b4:bf:08:9b:37:71:d2:68:
        81:8c:df:1f:64:a3:c3:d5:be:72:97:35:b6:30:7e:6e:ee:cf:
        2a:1b:59:83:b1:9a:ba:3f:52:b9:f2:68:d1:d4:b8:60:15:49:
        86:11:16:0f:31:0f:29:7e:3f:8f:fe:05:c1:ed:13:41:c3:58:
        c6:78:72:e4:de:7c:66:ed:0e:e7:74:c7:33:bc:57:69:a2:5b:
        62:7d:0c:df:fe:8a:78:0b:64:12:c7:08:39:c1:fe:a9:0a:47:
        26:37:3c:14:63:93:7c:75:81:d4:54:f8:94:9c:05:c1:3c:d2:
        c5:0b:52:8e:67:31:8f:f0:ed:f0:17:7a:db:3b:6f:c0:cc:78:
        62:ac:5c:fd:b2:af:42:04:77:d1:12:df:ca:e9:f3:66:a3:d6:
        f0:b6:0a:c9:35:9e:bd:f9:29:66:91:9a:06:51:59:03:b5:e0:
        45:74:92:3a:e9:34:cb:a5:b6:6e:f1:00:3d:cc:db:46:b9:1e:
        65:b3:6a:57:c4:86:92:9e:6f:62:fa:27:d7:df:fc:89:a9:37:
        b9:fc:a1:cd
Happy K8S! 😎
Local Docker runtime
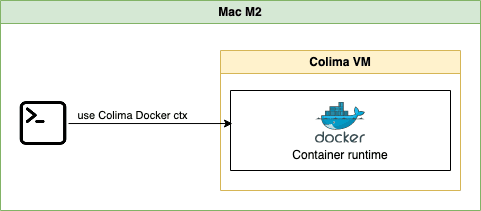
Let create Colima VM with profile named docker, Docker runtime, 2 CPU, 8Gi RAM, Disk 60Gi. We can use this docker runtime for local development with Docker.
colima start \
--profile docker \
--runtime docker \
--cpu 2 --memory 8 --disk 60
$ colima ls
PROFILE STATUS ARCH CPUS MEMORY DISK RUNTIME ADDRESS
default Running aarch64 2 4GiB 30GiB docker+k3s
docker Running aarch64 2 8GiB 60GiB dockerCheck docker context
docker context ls
NAME TYPE DESCRIPTION DOCKER ENDPOINT KUBERNETES ENDPOINT ORCHESTRATOR
colima moby colima unix:///Users/thetran/.colima/default/docker.sock
colima-docker * moby colima [profile=docker] unix:///Users/thetran/.colima/docker/docker.sockTips: Switch docker context with docker context use <ctx-name>
Let build a sample Dockerfile
FROM alpine:3
RUN apk add curlDockerfile
docker build -t alpine:curl .Check the image build
$ docker image ls
REPOSITORY TAG IMAGE ID CREATED SIZE
alpine curl c961778c5283 5 seconds ago 14MBSSH to Colima VM, we can get docker images as well ☺️
colima ssh -p docker
colima-docker:/Users/thetran$ docker image ls
REPOSITORY TAG IMAGE ID CREATED SIZE
alpine curl c961778c5283 2 minutes ago 14MBClean up
$ colima ls
PROFILE    STATUS     ARCH       CPUS    MEMORY    DISK     RUNTIME       ADDRESS
default    Running    aarch64    2       4GiB      30GiB    docker+k3s
docker Running aarch64 2 8GiB 60GiB dockerDelete Colima VM with colima delete -p <profile-name>
colima delete -p docker

# without -p, it will delete profile `default`
colima delete
Happy container! 😎